Our complete walkthrough has everything you need to escape the confines of your potential Terminal Escape Room Chapter Three tomb and the puzzles lying in wait.
The mental torture for our main character in Roblox‘s Terminal Escape Room goes on. After enduring a high-speed train in Chapter One and the station itself in Chapter Two, it’s time to overcome the confines of an elevator in Chapter Three—Descent—before unraveling a seemingly never-ending loop of puzzles and locations.
As we’ve seen already, the puzzles in Terminal Escape Room are not for the faint of heart, so let’s bulldoze our way through more challenging brainteasers.
How to complete Terminal Escape Room chapter 3
As expected, later chapters mean more puzzles, more time, and more panic setting in. But follow our advice, and you should be able to walk away scot-free.
But a word of wording: Whereas the first two chapters had similar answers anyone could replicate, I found the elevator to be far more random with its puzzles and answers, and this is evident with an elevator poster saying, “Reminder: All elevators are equipped with unique codes.“
So, use my methods to work out your specific numbers.
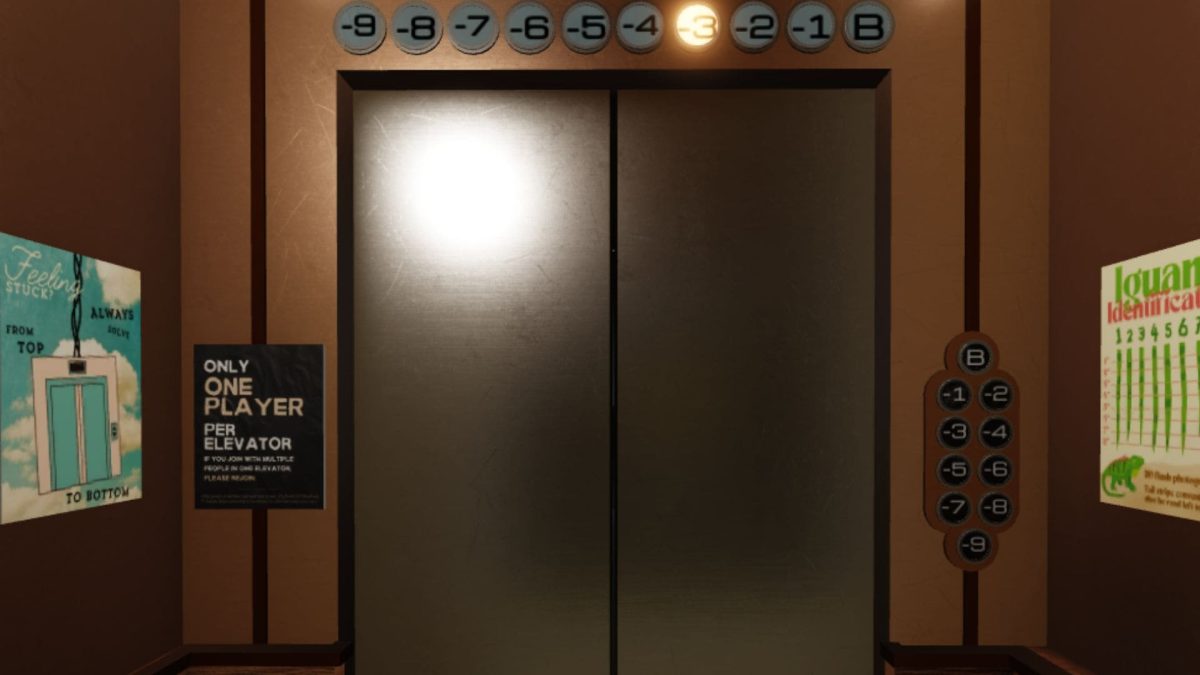
Elevator puzzle solution
- You need a code to escape the elevator.
- A poster behind you tells you to “Solve from top to bottom,” so look up and open the vent to reveal a ladder.
- Climb on top of the elevator, and you should see a special code on the wall.
- Get back into the elevator and look for the Pigpen cipher notice.
- Work out the symbols in the elevator shaft using the cipher.
- Mine spelled “Count the triangles.”
- Look around the rest of the elevator shaft because the walls are covered in symbols—count the triangle shapes.
- To get the second number for the elevator, learn “how to read Braille,” à la the poster in the elevator.
- Above the poster is a series of lights, and you need to find a light pattern matching one of the braille patterns.
- The third number requires you to use the Iguana Identification poster.
- Along the bottom of the elevator (below the Iguana poster) is a border matching the same kind of patterns on the poster. Find a matching one, and this gives you the third digit.
- The Archery Practice poster represents the final piece of the puzzle as you have to look at the elevator’s carpet floor to see a striking resemblance to the archery target.
- Any of the floor squares with a brighter red tinge mean it’s a hit target and needs to be added up.
- Use the chart to add any squares applicable to you, and the total score is your fourth digit.
- Input your bespoke code, and the elevator doors open.
Colored boxes puzzle solution
- Your first act in the second area is to dart around and collect every Box and Poster.
- It’s hard to help with this stage as it’s a case of looking up and down everywhere and in every room—but the time you are given is generous, so sprint around and be as quick as you can!
- When you’ve done this, go to the room with the boxes and locked wooden box and place your materials down where Terminal Escape Room tells you.
- You need another four digits to be successful, and to do this, you need to find the “Math Design” pages strewn around the environment and place the boxes to match the color of each sheet.
- For example, for me, the first page had blue in the top-left corner, orange top-right, purple, middle-left, white, middle-right, red in the bottom-left corner, and yellow bottom-right.
- I assembled the boxes to match the graphic and found and used the “App Design” sheet of the same number.
- The App Design sheet indicates the item the box needs to represent, and once you have the right color and design the sheets are looking for, they spell out a number.
- Do this with all four sets of sheets, and you have a four-digit number for the locked wooden box.
- Open it, and claim the Paint Can, Key1, Coin2, and white sheet.
Paint Cans puzzle solution
- Like the previous stage, collect every Paint Can (if you haven’t already) until your inventory in the bottom-left corner shows you have them all.
- Now, run around the area and look for numbers and colors on all the surfaces you know you’ve found as it says something like “2 = Yellow.”
- Track them down. note the combination in the text chat, and go to the room with the large white panel featuring numbers and your Paint Cans.
- Paint all the numbers with their specific colors you’ve already found as evidence scattered around.
- Once all the numbers are filled in with paint, you aren’t done yet, as you need to go to the side of the room and look at the poster on the wall saying, “All finished painting?“
- You should pick up on some clear mentions of colors in the text (“red” instead of “read“), and four colors in total are hidden in the text.
- Identify the four colors and check their respective paint supply left to get a number for each color.
- If the post mentions “blue,” and the blue pipe is filled to the 3ml line, the digit is a 3.
- Match the four secret colors to the paint left (in order) for each one, and you get a four-digit code to enter on the wall behind you—opening up the box to your right side.
- Take Key2, Coin2, and the sheet on the inside.
Newspaper puzzle solution
- Leave and head for the Newspaper room.
- On the floor is a newspaper you need to pick up, and it tells you the order the posters need to go in as outlines shapes, e.g. MINUS, TRI-ANGLE, SQUARE, and so forth.
- Whichever clue is first, for me, it was Plus. Put the sheet with the matching symbol into the middle section so you can read it, and it cleverly isolates a small handful of keywords.
- You need to put the words on the sheet in numerical ascending order (1, 2, 3) to get a sentence: “The Number Of Yellow Paint Squares,” is an example of my first clue.
- In this instance, go to the paint room and count the number of squares you painted yellow. This is the first digit.
- Rinse and repeat this process with all four sheets mentioned in the starting newspaper clue, and you get all four digits.
- Input the code into the locked box below the newspaper puzzle, and it should unlock, giving you Key3 and Coin3.
Arcade puzzle solution
- It’s time for the Arcade games room, and inside, find Coin4 situated on top of one of the arcade cabinets.
- Place a coin inside the four working arcade machines.
- I received 5 Tickets, 15 Tickets, 50 Tickets, and 100 Tickets.
- In the middle of the room above, examine the “Pick Your Prizes,” sign.
- Each of my four prizes capitalized specific letters—forming the words CHAINS.
- Type “CHAINS” into the cash register, and take the key from inside.
Nursery puzzle solution
- Use the four keys to unlock The Nursery in the middle of the complex.
- On the wall, find “Ms. Potata’s Clean Up Rules,” telling you the rules of the puzzle, and there are also posters scattered around the room, telling you the words you need to make.
- To make things easier, in case you can’t follow the complex and stringent parameters, I made the word “CLOUD,” using the first set of blocks—going clockwise from entering the room.
- My second word using the next set of blocks was “SPAC3.”
- With the third set of blocks, I made “OCEAN.”
- For the fourth and final set of blocks, I formed “PL4NT.”
- Each tower of blocks has a number on it from 1-4. This signifies the order you input the code.
- Now, find each poster, e.g. Cloud, Ocean, and stand on top of the red block with the poster on it, and you’ll see the red block formation you’re standing on forms a number.
- I found the red block formation featuring the Cloud poster spelled out “7” from above, and because it has the number “2” on its blocks, it means the second digit of the code is a 7.
- Repeat this with all word blocks and find the four numbers from looking at a poster’s red block formation from above.
- Finally, climb up to the very top of the room using the blocks and enter your code into the elevator code device—for transparency, I got 0743.


Published: Jun 20, 2024 04:58 am