The Fallen Archbishop Andreus is a step up in difficulty when compared to the first three bosses in Lies of P, and eliminating it will require some work on your part.
The Church’s corrupted Archbishop is the first boss you encounter in Lies of P with two combat phases. This means the fight is longer compared to the previous ones, and you have less margin for error because every HP potion is key to surviving the second phase.
Beating this boss requires a lot of patience. The boss’ patterns aren’t too challenging, but since it’s a long fight, your worst enemy is a lack of focus. All that said, we have some tips that make the fight easier.
How to kill the Fallen Archbishop Andreus in Lies of P
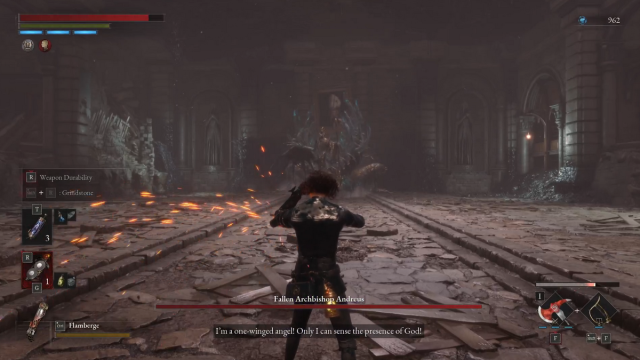
The Fallen Archbishop Andreus is a boss that deals occasional Acidic damage, but mostly dishing out physical stomping attacks.
It features an enormous hitbox and has a long-range in the second phase when its “snake” form targets you, so you need to use your endurance with parsimony to get the best balance between parrying and dodging attacks.
Battling it with a Specter can also be challenging since you can’t hit the boss from the back, at least in the first phase, due to its armor. Some of its attacks also have a wide range, so it hits you from some unexpected angles, even when aiming the Specter.
Beware of Acidic damage

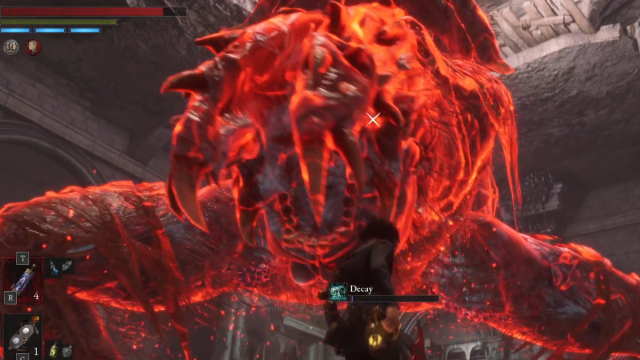
You have a lot of attacks to dodge and parry when fencing off against the Fallen Archbishop Andreus, but Fury states aside, Decay attacks are the deadliest for you (especially if you’re not equipped with cleansing potions).
These attacks are swift, so we recommend being careful and not striking with more than two successive hits when the boss isn’t staggered in some way. You can quickly recognize it, as Decay attacks are inflicted with its purple tongue.
In the second phase, as well as this attack, the other part of the boss also periodically unleashes waves of Decay matter on the sides and in front of it. If you parry it but don’t manage to get a Perfect Guard, your Decay bar will partially fill, so you need perfect timing.
Simply walk through the Fury stomping attack
Fortunately, the Fallen Archbishop Andreus doesn’t unleash many different Fury attacks. If you don’t dodge or parry them, however, you receive heavy damage and are staggered for a short amount of time. While you can Parry the Fury attack, where it will stomp one leg on the ground, it’s easier to simply walk behind it when it charges the full stomping attack. This also allows you to regenerate.
Restore your weapon’s Durability
Decay not only deals damage over time when the gauge is full, but it also decreases your weapon’s Durability, which can be critical. The start of the fight’s second phase is the ideal time to restore your weapon’s Durability, especially since more Decay would destroy them.
How to survive the double shockwave
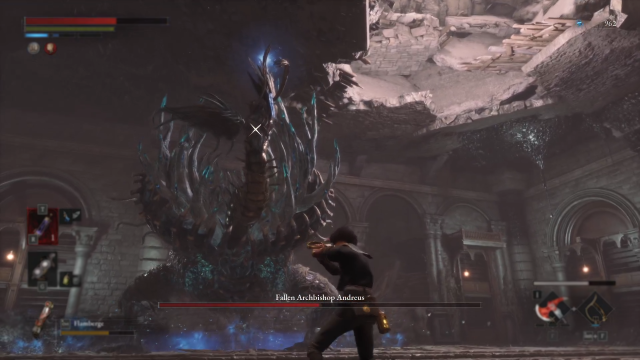
The most crucial moment in your fight against the Fallen Archbishop Andreus happens when it reaches half its HP in phase two. At that moment, the boss stands on its legs and starts charging a huge shockwave.
The front unleashes the first wave, and the back the second one. If you don’t dodge this attack, you will die. We don’t know how much of your life it takes, but we never survived it, even with over 70 percent HP remaining.
After countless failed attempts by running under the boss (only to get stomped on the ground) or parrying the wave (which doesn’t work), here is what we found to dodge the attack easily:
- You can trigger both sides of the boss. For an easier dodge, it’s recommended to switch the boss to the front side (from the first phase) so you aren’t targeted by the second shockwave.
- When the boss starts to charge up its shockwave, run to its feet.
- As soon as the wave is unleashed, run far away from it (on the side of its head). It stomps the ground to unleash the second shockwave behind it.
You’re supposed to have time to run away from under it before it stomps the ground thanks to a slight delay. Once you learn to recognize when the first shockwave unleashes, and you’re safe to run, it is an easy dodge.
After this attack, there won’t be any surprises for you. The boss needs some time to stand up again due to the strength of the attack, so it’s the perfect opportunity for you to land a Charged Attack or a Fable, and trigger a Groggy state that allows you to land a deadly combo.


Published: Sep 15, 2023 09:01 am