
Whether you’re a casual pubs player or someone who enjoys the more serious environment of ranked queues, there’s nothing better than beaming an enemy using the very best controller settings in Apex Legends.
Depending on whether you are playing controller on computer, old generation devices, or even on the latest console, your aim assist strength will vary. Since season 22, those playing controller on PC and in crossplay lobbies now play on a 0.3 aim assist strength, while PlayStation 4 and Xbox One users continue to use 0.6 in console lobbies.
If you’re a casual player, the aim assist nerf may have impacted your battle royale gameplay. But it’s nothing practice can’t fix. Here are our recommendations for the best controller settings on Apex Legends in 2025.
Table of contents
Apex Legends: Top controller settings
While settings are down to preference and comfortability (with some utilising the claw grip), there are better options than others (regardless of how you hold the controller). If you don’t want to use the claw grip, you can rearrange the button layout to suit your needs.
Button layout settings
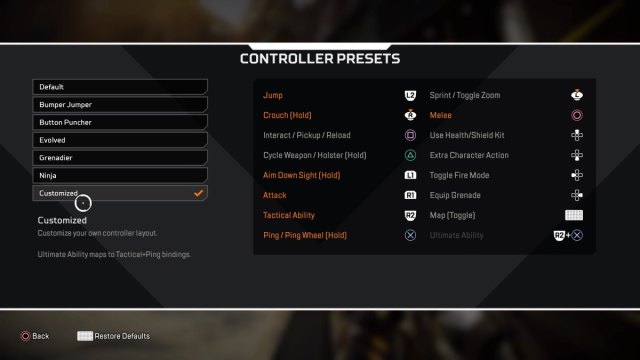
We recommend either Bumper Jumper or Button Puncher presets for beginners. These either swap Jump with Tactical Ability, or Melee with Crouch. If you want to experiment further, we highly recommend combining these presets under the Customized preset option.
You should also swapping the triggers and bumpers if you’re playing on PlayStation 5. This change is recommended exclusively for PS5 users due to the stiffness of the bumpers. Swapping these round should feel more seamless and remove that frustrating stuttering effect bumpers can cause mid-spray.
Having Crouch on the right analog stick lets you easily bunny hop, while moving your Jump to left trigger means you can execute wall bounces and become a difficult target while reloading. This also helps in close-range fights to switch up your movement while hip-firing, making you a harder target to hit.
Be mindful a Customized preset will take time to get used to. If anything feels uncomfortable after multiple sittings, rearrange the preset settings to suit your playstyle and match priorities. For example, if you use explosives as much as your abilities, then moving the Grenade slot to a bumper (similar to CoD settings) may feel more natural.
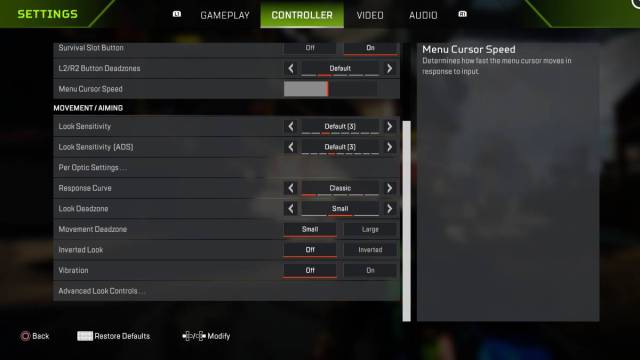
Controller settings
You can refer to our images for the best settings, but here is a rundown of why each setting has been picked:
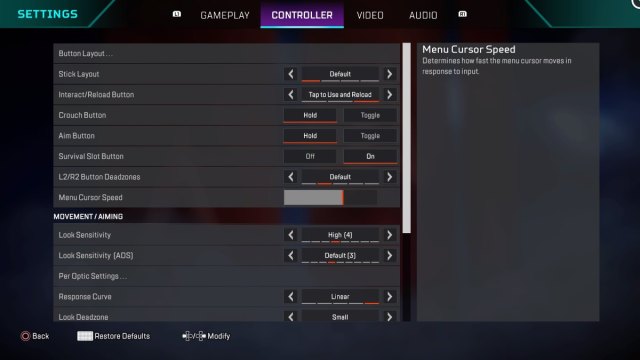
General
| Setting | Choice | Reasoning |
|---|---|---|
| Stick Layout | Default | There’s no need to change this, as it will only confuse your gameplay. |
| Interact/ Reload button | Tap to use and reload | As reviving is the same button as interact and reload, it’s better to tap to use and hold to revive to limit team reset mistakes. |
| Crouch button | Hold | Hold removes any extra steps you’d need to adjust your movement. |
| Aim button | Hold | Same reason as Crouch. |
| Survival Slot | On | Leave on for beginners. Turn off if you’ve mastered your settings. |
| L2/R2 Button Deadzones | Default | Set this to None if you’re aiming and shooting with triggers. |
| Menu Cursor Speed | Over halfway | This setting is only relevant to armor swap speed. |
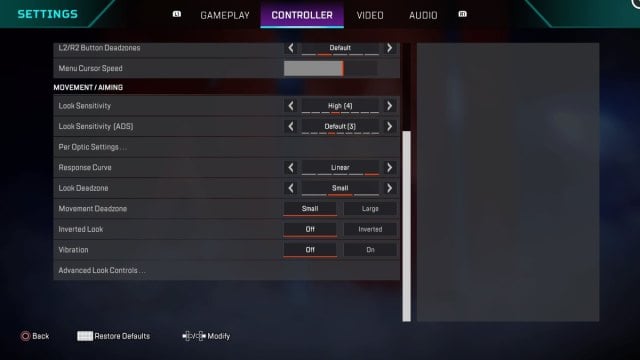
Movement and Aiming
| Setting | Choice | Reasoning |
|---|---|---|
| Look sensitivity | Four | You want this higher than ADS speed to track enemies while using hip-fire. |
| ADS | Three | This should be lower than your overall sensitivity so you can track enemy movements in mid- to long-range fights. |
| Response Curve | Linear | Linear gives more freedom in control and tracking. It doesn’t feel as stiff and slow as Classic. |
| Movement Deadzone | Small | Unless you have an uncontrollable stick drift (I’m looking at you, Genburten), you should leave this on Small. |
| Inverted Look | Off | No explanation needed. |
| Vibration | Off | Turn off vibration so your aim isn’t affected by enemy explosives and abilities. |
Another preference pick we recommend is Linear over Classic to track and adjust your aim quicker while ADSing. Through experimentation, we’ve determined that Classic is better for long-range battles (marksman, rifle, and burst weapons), and Linear is stronger on close- to mid-range fights (shotgun and SMGs). There’s more room for error with Linear, as you can adjust your aim to whatever threat is ahead of you. Classic players will have a harder time adjusting to movement legends and PC players, especially if they’re jumping around in your face.

Gameplay and Video
Turn off Taking Damage Closes Deathbox, leave Always Sprint on, turn off FOV Ability Scaling (primarily affects Octane players), and switch Sprint View Shake to Minimal.
Having full control of your deathbox will let you execute armor swaps. Leaving sprint on lets you slide easier, and you can easily swap to walk by reducing how much you pull the analog stick. FOV Ability Scaling and shake can cause visual distortion and increase clutter, so turning these off is essential for a clutter-free game.
Custom ADS control recommendations
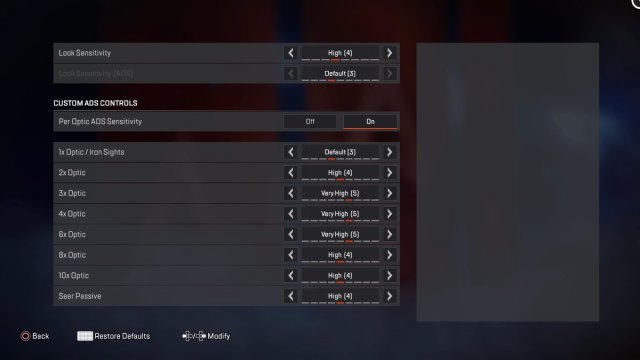
Due to the aim assist nerf that reduces the strength from 0.4 to 0.3 (25 percent reduction) in crossplay lobbies, you will either want to increase or reduce your optic sensitivity. We recommend starting off on Default and adjusting to improve your tracking.
- 1x Optic/Iron Sights – Default Three
- 2x Optic – High (Four)
- 3x Optic – Very High (Five)
- 4x Optic – Very High (Five)
- 6x Optic – Very High (Five)
- 8x Optic – High (Four)
- 10x Optic – High (Four)
- Seer Passive – High (Four)
Advanced Look Controls in Apex Legends
- Deadzone – 15 percent
- Outer Threshold – Five percent
- Yaw Speed – 320
- Pitch Speed – 260
- ADS Yaw Speed – 25 percent
- ADS Pitch Speed – 25 to 28 percent
- ADS Turning Extra Yaw – Zero percent
- ADS Turning Extra Pitch – Zero percent
- ADS Turning Ramp-up Time – Zero percent
- ADS Turning Ramp-up Delay – Zero percent
- Target Compensation – On
- Melee Target Compensation – On
If classic sensitivity settings aren’t for you, you may find better luck with ALC. These are used to set each individual aspect of your movement, strafe, and ADS to a percentage that fits your playstyle. Reduce deadzone as much as you can, but expect stick-drift with ALC enabled.
You will want to mess around with your Yaw Speed (horizontal sensitivity) and Pitch Speed (vertical sensitivity). This will determine how fast you react to danger and how much tracking control you have in a hip-fire spray.
The Reticle is the final change you should make to your tailored settings. I currently use light blue, but you should experiment with reticle colors and select based on the map you’re playing on. Finally, avoid colors that blend in with enemies (like using a red laser and reticle while playing Recon).
Apex Legends: Best controller settings for beginners
Button layout settings

We recommend either Bumper Jumper or Button Puncher presets for beginners. Because perfecting movement won’t be a priority when you’re new to Apex Legends, we recommend Button Puncher to swap your Melee with Crouch, making you a harder target to hit in fights where hip-firing is appropriate. While it’s not a necessity, we’ve found shooting with triggers, not the bumpers, is better because it’s more reactive and shouldn’t wear out as fast as repeated use of the bumpers. This swap shouldn’t take too long to get used to.
Crouch is more accessible on the right analog stick, so you don’t have to switch to the claw grip or waste time reaching for this button when you’re strafing and tracking a target.
Controller settings
General
| Setting | Choice |
|---|---|
| Stick Layout | Default |
| Interact/ Reload button | Tap to use and reload |
| Crouch button | Hold |
| Aim button | Hold |
| Survival Slot | On |
| L2/R2 Button Deadzones | Default |
| Menu Cursor Speed | Over halfway |
Movement and Aiming
| Setting | Choice |
|---|---|
| Look sensitivity | Three |
| ADS | Three |
| Response Curve | Classic |
| Movement Deadzone | Small |
| Inverted Look | Off |
| Vibration | Off |
We recommend Classic for beginners so you can focus purely on improving your accuracy and tracking. Get used to the speed of the game and find a main to master. You can get movement naturally by picking legends like Octane, Horizon, Pathfinder, Wraith, Alter, Valkyrie, or Ash. These will boost you and make you a harder target to track and counter.
While we’ve found Classic strengthens accuracy, it does feel less reactive than Linear. But, if you’re consistently using the same weapons, then one-clipping enemies should become a frequent occurrence for you. Remember to strafe in close-and-mid-range fights so you’re not an easy target to punish.
Know that your opponent isn’t moving faster than you. Never panic or assume they’re doing something you cannot confidently track. Panicking will only lower your confidence, which negatively affects your accuracy.
Don’t enable Per Optic Settings, as changing these can mess with your recoil control and ability to track. Only switch these up if you’ve noticed a significant difference between your accuracy at close-, mid-, and long-range.
Gameplay and Video
Turn off Taking Damage Closes Deathbox, and FOV Ability Scaling (primarily affects Octane players), and switch Sprint View Shake to Minimal. This is so you can armor swap and reduce visual clutter. Finally, have Always Sprint enabled to increase your overall movement speed, making it easy to react to moving targets, and effectively increases the pace of gameplay.


Published: Mar 28, 2025 08:15 am