The best settings for THE FINALS enhance your competitive edge without hampering performance. Generally, the best settings increase your FPS, making your gameplay smoother and more precise.
Although certain settings are down to personal preference, there are indeed definitive best settings for THE FINALS competitive play. This is true for all game modes, as well. In this guide, we’ll describe each one and explain why you should give them a shot.
THE FINALS best settings
In THE FINALS’ settings, you can customize many different aspects of the game to tailor it to your own playstyle. It might seem overwhelming at first, but don’t skip this step before heading into your first game.
Gameplay Settings
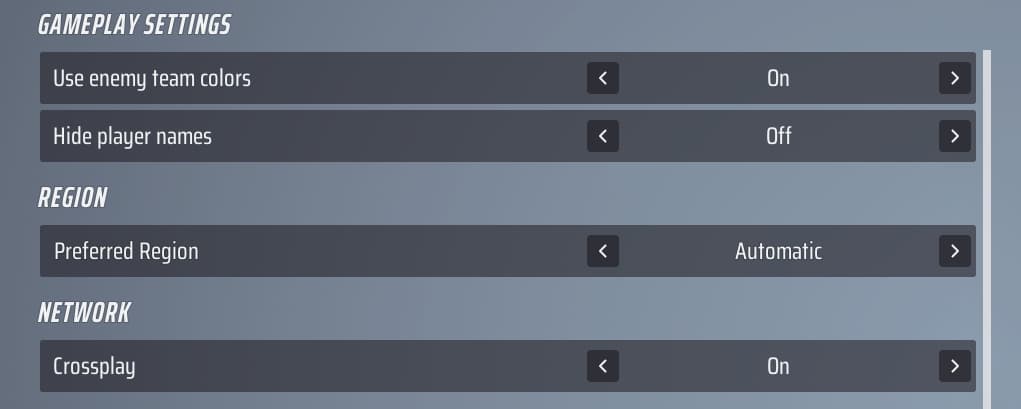
If you’re on PC, generally you’ll want to turn crossplay off, so you’re not matched with console players. But it’s possible to leave it enabled if you need to party up with a friend from another platform.
Crosshair settings don’t offer many different choices, so it shouldn’t be too challenging to find the style that suits you best. Still, if you need some guidance, here are a few suggestions for crosshairs.
- Pick a bright color, particularly red, blue, or yellow. Avoid pink and orange, since the map is filled with those colors and it might become confusing.
- Make sure to use the center dot.
- Adjust your crosshair size to the optimal size. It shouldn’t be so small thatyou can’t see it, nor so big that it covers your target.
Controller, mouse, and keyboard settings
These settings generally vary from one player to another. They’re highly customizable, which means you can choose input settings that best fit your personal gameplay style. Having said that, we found best success using the following settings:
Controller settings
- Look Sensitivity Horizontal: 160
- Look Sensitivity Vertical: 130
- Zoom Sensitivity Multiplier: 40 percent
- Focal Strength Sensitivity Scaling: On
- Horizontal Look Boost: 220
- Vertical Look Boost: Zero
- Look Boost Ramp Up Time: 0.5
- Zoom Horizontal Look Boost: 40
- Zoom Vertical Look Boost: 40
- Zoom Look Boost Ramp Up Time: 1.2
- Aiming Inner Deadzone: 10
- Movement Inner Deadzone: 15
- Invert Vertical Look Input: Off
- Response Curve: Exponential
- Look Acceleration: Zero
Controller bindings
- Preset: Equipment Wheel
- Crouch Behavior: Toggle
- Sprint Behavior: Toggle
- Zoom Behavior: Press
Aim Assist
- Aim Assist: On
- Sensitivity Reduction: On
- Target Tracking: On
- Zoom Snapping: On
Mouse and keyboard settings
- Mouse Look Sensitivity: 29 (with 1450 DPI)
- Mouse Zoom Sensitivity Multiplier: 100 percent
- Mouse Focal Length Sensitivity Scaling: On
- Mouse Invert Vertical Look Input: Off
In particular, mouse sensitivity tends to vary substantially between players, depending on the DPI of their mouse.To find the sensitivity that works best for you, head into Practice and see what feels closest to your favorite other first-person shooters.
Some players suggest that ideal mouse sensitivity should enable a full camera rotation with a single sweep of your mouse across the mousepad. If you’re using a larger mousepad, consider the maximum distance you’re comfortable moving your mouse and adjust accordingly.
Keybindings
You can change pretty much all key bindings in the game, andt it can be challenging to figure out what works best for you. Here are some popular choices in FPS games that we use and strongly recommend:
- Melee Attack: Middle Mouse Button (instead of V)
- Loadout Slots: The 1, 2, 3, and 4 keys might not be easy to use for everyone.
- If you prefer using a number key for grenades, you can set a Loadout Slot to G.
- Also, consider changing the Interact key (that lets you use Jump Pads and Turrets) to F.
Accessibility settings
- Colorblind Mode: Personal preference
There are plenty of other settings that provide accessibility benefits, and you should choose them based on your own personal needs and preferences.
Audio settings
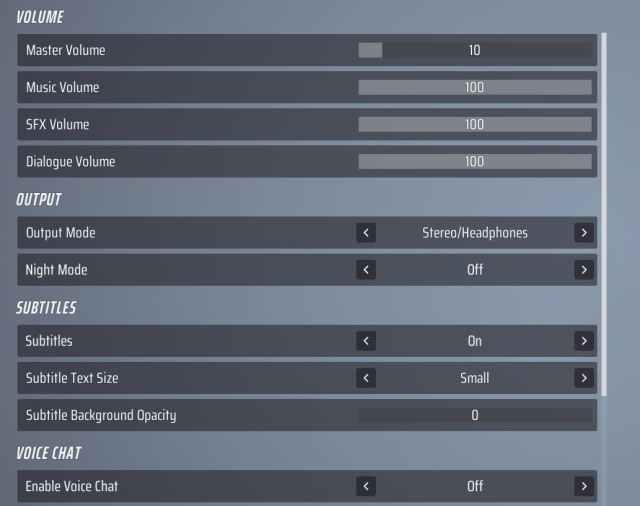
Audio settings truly depend on what you’re most comfortable with. The only thing we changed was the Dialogue Volume, which we reduced by half. Although the live cast is a great addition to the fun, it doesn’t really help you achieve victory and can even distract you.
Volume
- Master Volume: 75
- Music Volume: 100
- SFX Volume: 100
- Dialogue Volume: 50
Output
- Output Mode: Depending on your device
- Night Mode: Off
Subtitles
- Subtitles: On
- Subtitle Text Size: Small
- Subtitle Background Opacity: Zero
Voice Chat
- Enable Voice Chat: On
- Mode: Push to Talk
Video settings
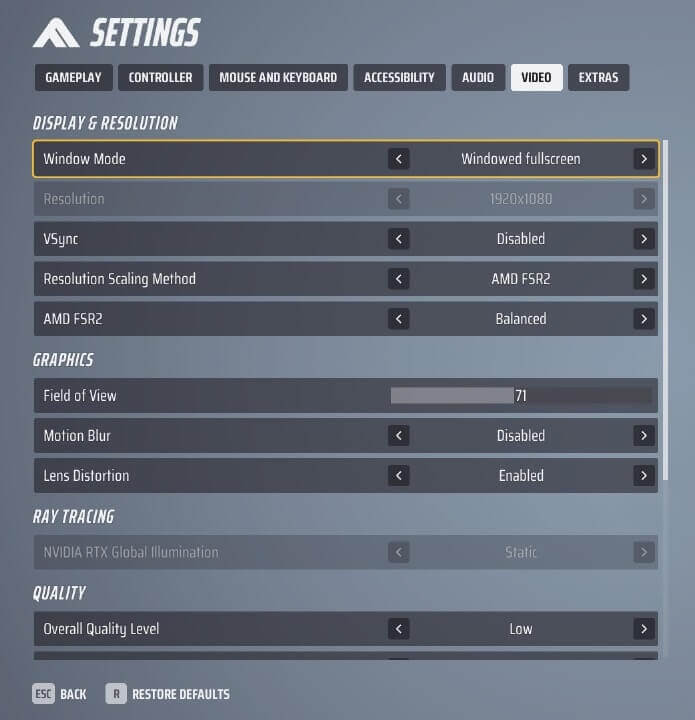
Video Settings are crucial to your game’s performance. Higher graphics will be more demanding for your setup, while lower settings will enhance your frame rate. Not all of them are worth turning off or setting to low, however.
Display & Resolution
- Window Mode: Fullscreen (for better performance)
- Resolution: Your monitor’s resolution
- V-Sync: Disabled
- NVidia Reflex Low Latency: On
- Resolution Scaling Method: Nvidia DLSS
- Nvidia DLSS: Performance
Graphics
- Field of View (FoV): 90 (it’s key to see enemies from further away)
- Motion Blur: Disabled
- Lens Distortion: Disabled
Ray Tracing
- Nvidia RTX Global Illumination: Static
Generally, Motion Blur, Ray Tracing, and V-Sync should be turned off to give you the best performance and visual clarity. Motion Blur can obscure the screen, Ray Tracing requires a lot of resources, and V-Sync can add input lag. If you want a better image quality and have suitable hardware, feel free to enable Ray Tracing and switch from DLSS to DLAA.
Generally, Motion Blur, Ray Tracing, and V-Sync should be turned off to give you an advantage in your games. Motion Blur clutters the screen, Ray Tracing takes a lot of resources, and V-Sync will add input lag. If you want a better image and have fitting hardware, feel free to enable Ray Tracing and switch from DLSS to DLAA.
For AMD GPUs, the settings might differ, but we still advise opting for a balanced or performance-focused approach to AMD FSR2. This ensures THE FINALS doesn’t use too many of your computer’s resources. And remember, keep VSync turned off.
As for the quality options, it’s better to have everything set to low if you’re aiming for the highest FPS average possible, except for View Distance, since you need it to see enemies and the environment from a distance. Better graphics don’t usually improve your performance but come at the cost of framerate, even if you’re using a high-end setup.
Quality
- Overall Quality Level: Custom
- View Distance: High
- Anti-Aliasing: Low
- Shadows: Low
- Post-Processing: Low
- Texture: Low
- Effects: Low
- Foliage: Low
- Global Illumination Resolution: Low
After you’ve tweaked all your settings, you can get started and further adjust them to your liking as you progress through THE FINALS.




Published: Mar 4, 2024 05:25 pm