Starfield is a stunning game, which means you are likely going to want to take screenshots throughout your adventure.
Fortunately, thanks to Starfield‘s Photo Mode, you don’t need to try to mess around with finding the right angle, removing the UI, or quickly hitting that screenshot button to take great photos in Bethesda’s RPG. Here’s how you can take pictures with Starfield’s Photo Mode, what all the options mean and, most importantly, how to save them.
How to access Photo Mode in Starfield
Starfield‘s Photo Mode doesn’t unlock immediately, instead, it unlocks after you have created your character. You can access Photo Mode at pretty much any time in the game.
To access Photo Mode on Xbox Series X|S, press the menu button on your controller to bring up the screen that shows your character, then press it again to bring up the main menu. If you’re on PC, press Tab then Tab again on your keyboard. Photo Mode is one of the options in the main menu so select it and you should enter Photo Mode.
You know you’re in Photo Mode because you see the exact moment you paused, but while the scene is still, there will be a dotted grid over the screen and photo options in the right-hand corner.
How to take photos in Starfield Photo mode, options explained
Once you’re in Photo Mode, there are an abundance of options available for you to take a great photo. But what do they all do?
Camera options
Camera options (identified by a camera icon) do what it says on the tin. These options allow you to set options specific to the in-game camera, including whether you have free reign over your camera angles and how close to your subject the camera is. Here’s a breakdown of the available camera options:
Camera type
There are three options here: free, orbital, or selfie. Free allows you to move the camera as you please, orbital fixes in one position, while selfie allows you to take, well, a selfie.
Field of view
This is a scale. The higher you set your field of view, the more of an area you can see, the lower the field of view, the closer the camera, reducing the visible area.
Camera roll
This is also a scale and tilts your camera left or right. Lower on the scale tilts you left, higher tilts you right.
Depth of field
This can be toggled on or off and controls the focus of your image. This is helpful if you want to take a close-up image but focus on a particular aspect of it, blurring the background. If you turn this on then you can also control the strength and how much it is near start or near plane (which lets you blur parts of your image)
Character options
These options let you control whether your character is in the photo and, if they are, what pose they’re doing. Here are all the options:
Show player
This option allows you to either have your character in the photo or not. You can toggle this off or on.
Pose category
From what I’ve seen, this is set to standard and can’t be changed.
Pose
If you choose to keep your character in the shot, then you can choose the pose they do in the photo (but you can opt to not do a pose at all). Here are the available poses:
- Boxer
- Cower
- Hands on hips
- Jump
- Kneeling
- Sit on ground
- Sneak
- Wave
- What’s up?
- None
Brightness and contrast options
These options allow you to change the brightness, saturation, and contrast of your photo. Here’s a breakdown:
Brightness
Fairly straightforward. This slider allows you to set how bright the image is overall.
Saturation
The saturation slider lets you set the depth and intensity of the colors in your image.
Contrast
This slider lets you set how obvious the differences in luminance are in the image. Higher makes your image darker and lower makes it lighter.
Filter options
You don’t have to set a filter on your images, but these options do let you get more creative with your photography. Here are the options:
Filter
A filter adds a layer over your photo that changes its overall look or color, imagine you put a special lens over your camera. There are several filters available under this option but none include dog face:
- None
- Mercury Era
- Gemini Era
- Apollo Era 1
- Apollo Era 2
- Dusty
- Binary
- Astral
- Bloodshot
- Dystopia
- Grunge
- Bleach Bypass
- Abandoned
- Swamp
- Black & White
- Film Noir
- Vintage
- Night Vision
- Negative
Filter intensity
This slider allows you to set how prominent your filter is. Higher means your filter is more prominent and lower makes it less.
Vignette intensity
This slider lets you set how dark the corners of your photo are.
Texture Category
This is set as standard and can’t be changed from what I’ve seen so far.
Texture
Texture in photography focuses on the micro-depth of areas, rather than the overall picture. This is a great way to make your images look that bit more interesting. There are a couple of options here:
- None
- Reseau Grid 1
- Reseau Grid 2
- Reticle 1
- Reticle 2
Texture Intensity
This slider sets just how prominent the above texture is in the image.
Frame options
Now, frames aren’t for everyone and you may not want to add them if you’re looking for a more natural, professional look. There are, however, some great options available.
Frame category
There are three frame category options: themed, factions, or branded. The themed category offers a number of novel options, like your image on the front of a magazine. Factions allows you to add faction-specific frames to your image. Branded frames are all Starfield-specific.
Frame
Frame options depend on which frame category you choose, but here are all the available frames for each category.
Themed frames
- None
- Classic cover
- Flight manual
- Vintage poster
- Field notebook
- NASA punk
- Letterbox
- Field scope
- Viewfinder 1
- Viewfinder 2
- Danger
- Chronomark
Faction frames
- None
- Constellation 1
- Constellation 2
- Constellation 3
- Constellation 4
- United colonies
- Freestar
- Crimson fleet
- Ryujin
- Vanguard
Branded frames
- None
- Blue livery
- White livery
- Logo
- Grav wave logo
- Grav waves
- Bracketed logo
- H stripes
- V stripes
- Launch
- Adventure
- Starfield
- Wanderers
Once you have lined up your shot, press ‘A’ on Xbox Series X|S or ‘E’ on PC to take the photo.
How to save Starfield Photo Mode photos
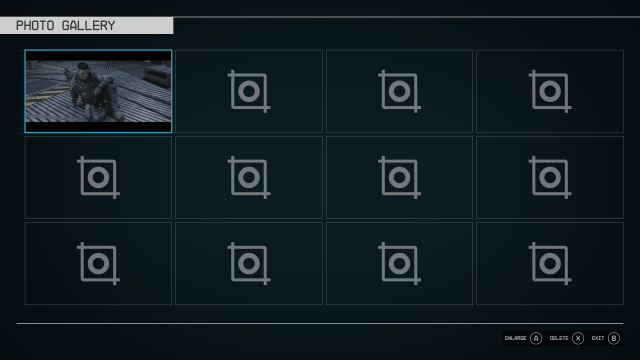
After you’ve created your photo, you’re probably wondering how to save it right? Starfield doesn’t make it obvious how you can do this.
You can find your taken photo in the Starfield Photo Gallery, which you can find below where the Photo Mode option is on the main menu. So exit Photo Mode and navigate there.
Open your photo in the gallery, then press the view button on your controller or G on your keyboard to hide your UI. You should then screenshot the gallery image as you would normally take screenshots. This is using the share button on an Xbox controller or the Windows key plus print screen on your keyboard (though you may have other screenshotting software you would prefer to use).
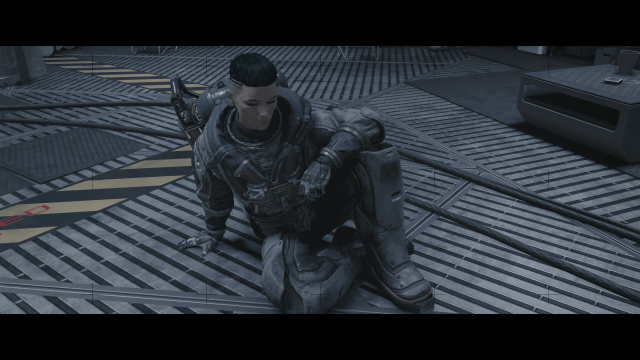
You can see my masterpiece above, which I like to call ‘Alone in Space’. I couldn’t stop my character from closing her eyes but I feel like it gives the image an aura of hopelessness. As you can tell, I am not a photographer.


Published: Sep 1, 2023 06:10 am