
Soulmask is the latest in a long line of massively popular 2024 survival games, and just like all the others, you have to take matters into your own hands if you want to play the game on a private online server.
Thankfully, setting up a dedicated server for Soulmask doesn’t seem to be nearly as tedious as the process has been for other games in the past (looking right at you, Palworld). Still, the nature of the beast dictates that there is absolutely nothing intuitive about the process, so you’re still going to want to follow a guide closely.
Here’s how to set up a dedicated server in Soulmask.
How to set up and host a dedicated Soulmask server
To start a dedicated server in Soulmask, you’ll need to first download SteamCMD which is essentially just a version of the Steam launcher that allows you to input custom command lines. While that is downloading as a .zip file, make a new folder anywhere on your disc to extract the file too when it’s finished downloading. After you’ve extracted the contents to a new folder, you’re ready to start setting SteamCMD up for hosting a Soulmask server.
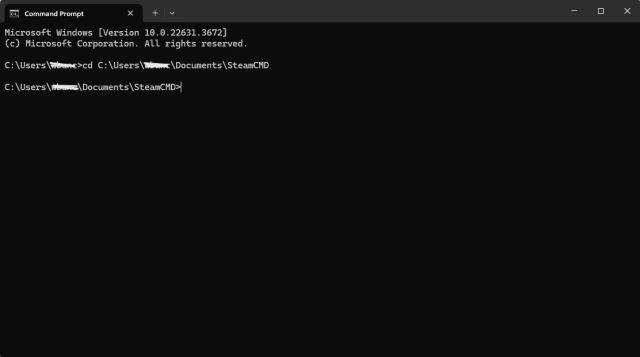
Use the Windows search bar to search for “cmd,” which should turn up the Command Prompt program. Run the program, type “cd,” then copy and paste the file path to the file you made for your .zip. For example, I made a folder called “SteamCMD” in Documents, so my full command line was:
- cd C:\Users\username\Documents\SteamCMD
Your path will likely be different—the easiest way to make sure things go smoothly is just to copy and paste the path to the folder directly from File Explorer. If Command Prompt successfully runs Steamcmd, you’ll be able to input new lines of code. If it doesn’t work, some variation of “the path cannot be specified” will appear, and that means there’s something wrong with the file path you input after cd. Once you successfully run Steamcmd and can input more commands, copy and paste the following line:
- steamcmd +login anonymous +app_update 3017310 validate +quit
This line doesn’t depend on specific locations or anything—copy and paste it exactly as written. The server will take a minute or two to download, after which point you’ll see the line, “Success! App ‘3017310’ fully installed.” Congratulations, the hardest part is done.
Now, go into the folder where you extracted your .zip, and select steamapps, then common, then Soulmask Dedicated Server for Windows. My exact path was C:\Users\username\Documents\SteamCMD\steamapps\common\Soulmask Dedicated Server For Windows. Again, yours might be a tiny bit different depending on where you made your folder in step one.
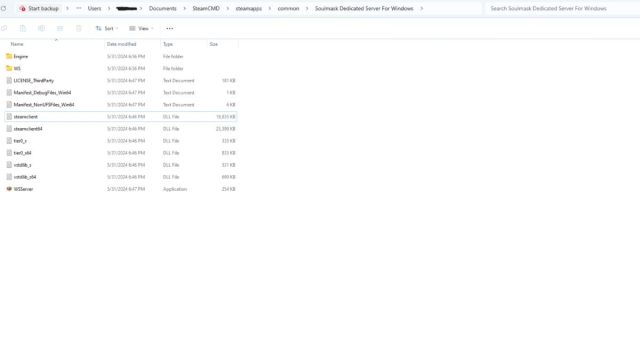
From here, right-click on the file named StartServer and select Edit in Notepad. Make sure you don’t just run the file, as you can’t make any changes to the file (modify your server’s settings) while it’s running. In Notepad, you can enter and modify different parameters to control your server’s settings. The most common are:
- -SteamServerName=\”your server name\”
- -PSW=\”yourpassword\”
- -pvp or -pve
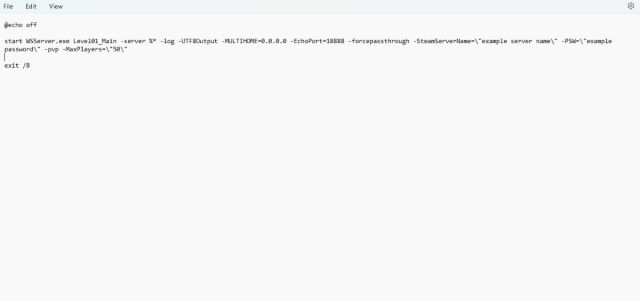
These modifiers should be input in the Notepad right after where it says “-forcepassthrough.” Each one should be separated by a single space. There are plenty of other parameters that you can use to modify your Soulmask dedicated server, and they are all listed on this Soulmask Wiki Page. The page also goes into some more complex troubleshooting topics like port forwarding, so it’s a great resource for any road bumps.
After you’re satisfied with your parameters, close the Notepad file (make sure to save it first) and run StartServer. So long as you keep that file running, you and your friends should be able to see and join your dedicated server in Soulmask.


Published: May 31, 2024 08:34 pm