
If you want to get the most XP possible in The Outlast Trials and increase your Therapy Level as fast as you can, then you need to focus and evade those Ex-Pop Agents for that hard-earned A+ grade.
Here is how to get an A+ grade in The Outlast Trials.
The Outlast Trials: A+ grade guide
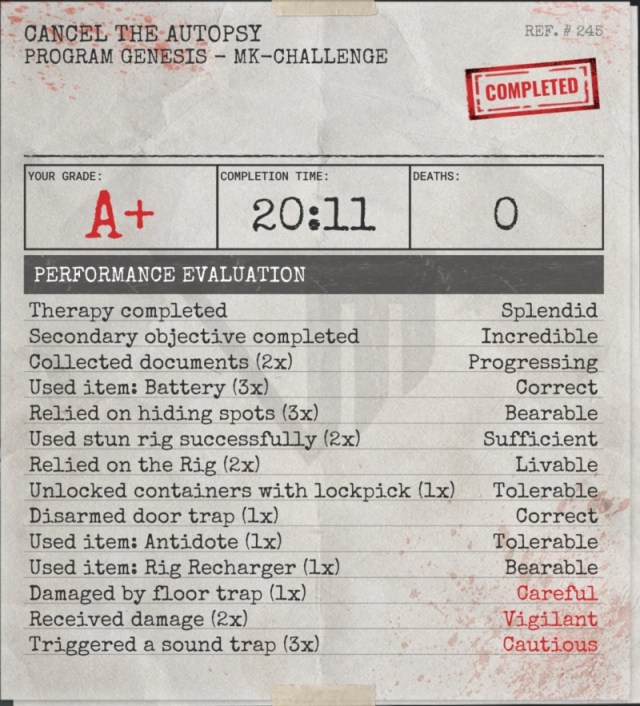
There is a lot to keep track of when it comes to your performance in The Outlast Trials. You should focus on completing your Trial or MK Challenge with as few problems as possible. Your completion time doesn’t count towards your grade so take your time to receive that A+. However, stepping on glass, hitting hanging sound traps, tripping mines, and receiving damage will automatically lower your grade.
You have leeway when receiving damage or triggering any alarms that can alert the Ex-Pop to your location. But if you repeatedly trigger alarms, use replenishment items regularly (Batteries, Antidotes, Rig Rechargers, or healing items), and take damage—or worse, get killed—your chances of getting that A+ lower drastically.
Try not to get killed during a Trial or MK Challenge. Although you have a second chance to complete the Program, a single death is highly likely to remove that A+ grade in your performance review. Make sure to complete any secondary objectives. These are often the collection of three propaganda posters, found scattered around the maps.
Let’s break down what you should and shouldn’t do to get A+ in The Outlast Trials.
| DO | DON’T |
|---|---|
| Listen out for enemy dialogue lines, changes in audio if you get spotted, and remember the map layout for a quick getaway. | Get killed. |
| Use throwables and your Rig to hurt or distract enemies. | Hide repeatedly inside hiding spots (under tables, desks, in lockers, and cabinets) |
| Complete any secondary objectives. | Trigger sound traps (glass, hanging traps, and enemy mines). They don’t always alert enemies but they can lower your grade if you become a repeat offender. |
| Collect Evidence (Murkoff folders scattered around maps). | Rely heavily on replenishment items (Rig Chargers, Batteries, Antidotes, and Medicine). |
| Look out for the red light above doors and disarm any traps you come across. You can crouch to avoid door traps if you accidentally trigger them. | Take damage from door traps or enemies. |
| Revive and heal teammates. | Get downed (co-op). |
We recommend hiding out in the darkness and relying on your night vision to avoid the enemies’ line of sight. This method works well against most enemies aside from the Night Hunter. Focus on taking little to no damage in your Trials, regardless of how long it takes to complete them.
Practice makes perfect, so don’t be worried if you can’t hit that A+ grade immediately. Learn the ins and outs of the Police Station, Fun Park, Orphanage, and Farewell Mansion to become a Murkoff Facility expert.


Published: Mar 5, 2024 10:41 am