
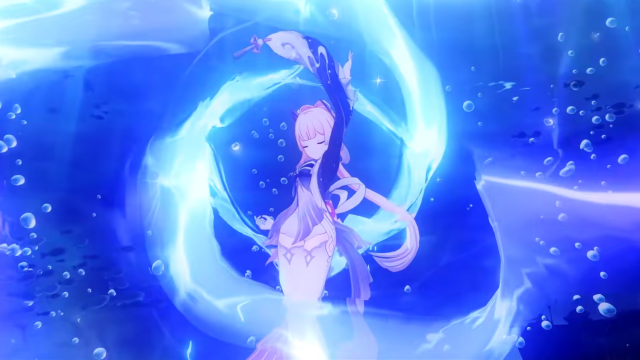
One of Genshin Impact’s most impressive healing and support units is Sangonomiya Kokomi, a five-star Hydro Catalyst character who hails from the Electro region of Inazuma. Kokomi is one of Teyvat’s best characters, but building her right is much more crucial to her success than it is with most other units, and selecting the best artifacts possible for her is perhaps the most important part.
Whether you already have Kokomi and are looking to build her up or you are preparing to pull for her on her banner, here’s what you need to know about the best artifacts for Kokomi.
What are the best artifacts for Kokomi in Genshin Impact?
Overall, I’d recommend most players equip Kokomi with the full four-piece Ocean-Hued Clam artifact set. This is the most powerful choice for her and will fully maximize her potential.
Because most of Kokomi’s skills are based around her healing prowess, you’ll primarily want to focus on equipping her with artifacts that feature health points and healing bonuses.
Kokomi is one the best healers in all of Teyvat and was mostly considered to be the singular best one overall but now has some decent competition for this spot since the arrival of the five-star Dendro Catalyst character Baizhu. Regardless, Kokomi remains one of the best playable units in Genshin you can add to your roster.
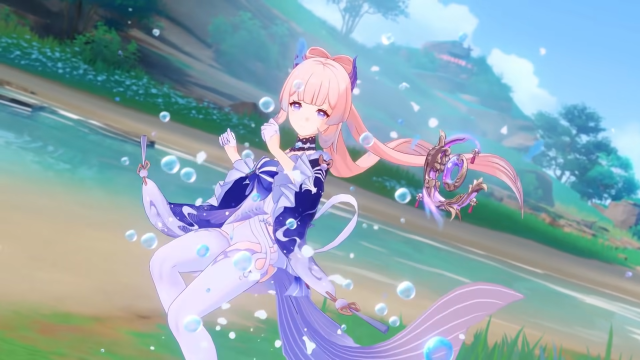
The Hydro character is a strong element applicator, which means she’ll consistently apply Hydro with ease to make activating elemental reactions extremely easy. Alongside this, Kokomi’s abilities are almost entirely dedicated to healing which means your team should have no problem staying alive and healthy.
Related: 20 best Serenitea Pot Replica ID codes in Genshin Impact
When building Kokomi, keep in mind that her passive “Flawless Strategy” ability raises her healing abilities at the cost of decreasing her critical rate by 100 percent. This means you essentially can’t build her critical rate unless you solely focus on it, which is not worth it since this isn’t a key part of Kokomi’s skillset.
Many Teyvat recruits have a wide range of artifact sets to choose from, but Kokomi only has three viable options with the Ocean-Hued Clam set being the best choice of all.
Ocean-Hued Clam
- Two-piece effect: A healing bonus of 15 percent is applied.
- Four-piece effect: When the character wearing this set heals a member of their party, a Sea-Dyed Foam appears for three seconds. The Sea-Dyed Foam then accumulates the number of health points that were restored during healing. Once the three seconds have passed, the Sea-Dyed Foam explodes and deals damage to nearby foes based on 90 percent of the total accumulated healing. The damage dealt by this effect is determined similarly to elemental reactions like Electro-Charged and Superconduct but is not changed based on elemental mastery, character levels, or elemental reaction bonuses. One Sea-Dyed Foam can be created every 3.5 seconds and it can accumulate up to 30,000 health points. Only one Sea-Dyed Foam can be active at a time and its effects can be triggered regardless of whether the wearer is active on the battlefield.
- Location: You can obtain this set by visiting the Slumbering Court Domain in Seirai Island, Inazuma.
Of all the artifact sets players can equip Kokomi with, Ocean-Hued Clam is the best choice for her. Kokomi isn’t going to be great at attacking when alone, but this set is an excellent way to ensure she can dish out impressive damage on occasion since it is based on her healing abilities, which she absolutely excels at.

Tenacity of the Millelith
- Two-piece effect: Increases the wearer’s health points by 20 percent.
- Four-piece effect: When an elemental skill successfully strikes an enemy, the attack of all nearby party members is then raised by 20 percent and their shield strength is raised by 30 percent for three seconds. Players can activate this effect once every 0.5 seconds and it can be activated regardless of whether the wearer is active on the battlefield.
- Location: Players can obtain this set by visiting the Ridge Watch Domain in Bishui Plain, Liyue.
In general, you’ll only really want to use the two-piece version of this set on Kokomi unless you also have a powerful shielder like Zhongli on her team. The effects of the full four-piece Tenacity of the Millelith set can be quite useful, but Kokomi and her teammates will benefit far more from only equipping the two-piece version of this set alongside a different set.
Maiden Beloved
- Two-piece effect: Increases the wearer’s healing effectiveness by 15 percent.
- Four-piece effect: Casting an elemental skill or elemental burst raises the healing received by all party members by 20 percent for the 10 seconds that follow.
- Location: You can obtain this set by taking on the Valley of Remembrance Domain in Windwail Highland, Mondstadt.
The Maiden Beloved set is another decent choice for Kokomi if you want to build her healing abilities and her damage. However, the four-piece version of this set is also not the best choice for her overall since you’ll still obtain better results with the full four-piece Ocean-Hued Clam set.
If you are looking to raise Kokomi’s healing effectiveness though, then you might like pairing the two-piece version of this set with one of the other ones.
If none of the full four-piece sets seem to fit right with your specific Kokomi build, you may also want to consider mixing and matching between them. This can grant powerful results for the Hydro character and is generally the best option for players who don’t want to use the full four-piece Ocean-Hued Clam set.
With the sets that work best for Kokomi, your options are as follows.
- Two-piece Ocean-Hued Clam and two-piece Maiden Beloved
- Two-piece Ocean-Hued Clam and two-piece Tenacity of the Millelith
- Two-piece Maiden Beloved and two-piece Tenacity of the Millelith
The fourth run of Kokomi’s “Drifting Luminescence” banner is currently live for the second half of Genshin’s Version 3.8 update. She will be available for you to recruit until Aug. 15, so be sure to add her to your roster while you can before Teyvat moves into Version 4.0 for the Hydro region of Fontaine.
We gathered this information by playing Genshin Impact Version 3.8 “Secret Summer Paradise” on PC.


Published: Jul 29, 2023 02:40 am