
Finding a safe in Dying Light 2 Stay Human can be equally exciting and disappointing if you don’t have the code for it. We will take care of the disappointment and leave only excitement because we have all safe codes in Dying Light 2 lined up for you.
There are 19 safe codes in total in Dying Light 2. Some of them are tied to quests, and others are just sitting in the open world, waiting to be found. In any case, safe codes are often hidden near the safe they open, but that doesn’t guarantee you will find the sneaky buggers. The codes are small sheets of paper and, therefore, easy to miss.
We can’t allow that to happen now, can we? We have all safe codes and safe locations in Dying Light 2, with instructions on how to find and decipher the codes. We’ll have to go to all four corners of the map and everywhere in between to collect all the safe codes, but the journey will be worth it.
How to get Book Club X quest safe code
Book Club X is one of the book-fetching quests given by Albert, the librarian. You must retrieve a selection of books from a marked apartment in Houndfield. While there, you will get ambushed by bandits. Kill them and continue looting the apartment. The safe code and the safe it unlocks are located within the same room.
The Book Club X safe code is 21-12-55, and is lying on the floor below the TV and the record player. The safe is on a shelf opposite of where you found the code, right next to the door from which you entered the apartment. Both are quest items.
How to get The First Biomarker quest safe code
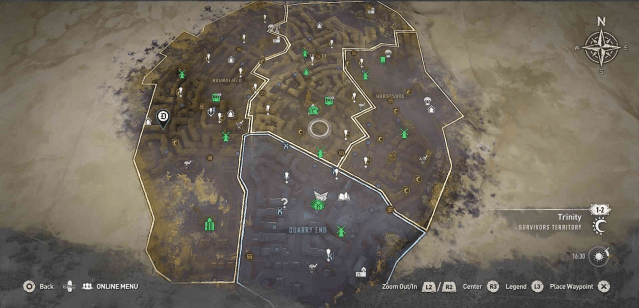
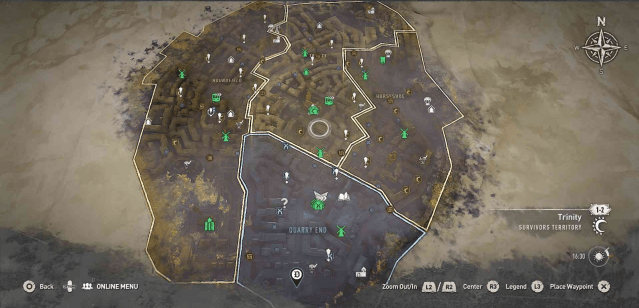
Finding the safe is the entire quest here. A chap named McGregor, located in the westernmost part of Trinity, will tell you all about his brilliant invention, called the Biomarker, that makes people faster and stronger. The design was considered too dangerous and thrown in a safe. McGregor wants the safe cracked and the Biomarker retrieved.
McGregor provides us with three riddles that reveal the safe code. The answers to the riddles are nine, seven, and three, respectively, hence the safe code 9-7-3. Getting to the safe requires some acrobatics. You must jump on the emergency ladder on the side of Saint Joseph Hospital and climb up. There’s an office with smoke coming out of it just below the large “Medical Center” sign. Climb up into the office and jump over the desk. The safe is on a shelf in the back.
Aiden will automatically use the Biomarker after acquiring it, causing McGregor to become mildly upset, but you will still be able to complete The First Biomarker quest and receive its rewards when you return to McGregor.
How to get Out of Your League quest safe code
We are headed back to Houndfield for another quest involving a safe code. This one is called Out of Your League, and there are a couple of things that need to be done in advance before we can get to the safe opening bit. You must complete the True Friends quest beforehand and progress the Out of Your League quest to where you have to find a necklace for Scott.
The necklace is found on a corpse sitting in a chair on the third floor of the Crocodile Flats, in central Houndfield. Lying on that same chair is a picture of a woman and a child celebrating the kid’s second birthday. The date 11/11/21 is scribbled on the picture, but that’s not the code. The safe code for Crocodile Flats is actually 11-11-19, the date of the child’s birth. The safe is in a library in the previous room.

How to get Houndfield Nightrunner’s Hideout safe code
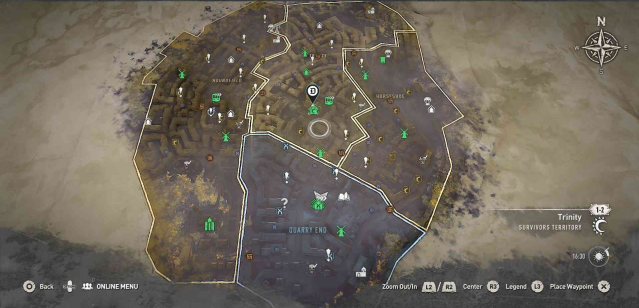
The fourth and final safe code in Houndfield is well hidden in the Nightrunner’s Hideout near the southwestern border with Trinity. Enter the hideout and run to the room on the right. There’s a wardrobe at the far end of the room. Move it to the side to reveal a shelter behind it and snatch the safe code from the box at the foot of the makeshift bed. Return to the previous room and use the code, which is 101, to open the safe.
How to get Trinity Bazaar safe code
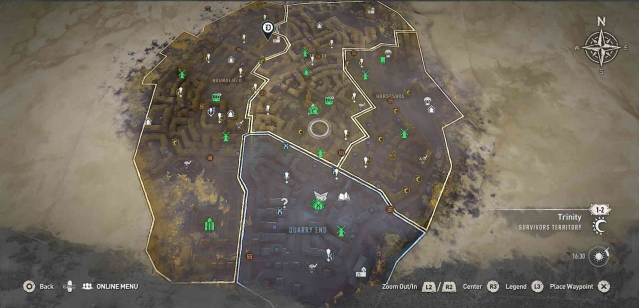
The only safe code in Trinity is in a small room at the top of the Bazaar. You will be doing a lot of parkour to get this one, but the path is railroaded enough that chances of getting lost are near zero. Just stick to the wooden platforms and follow the yellow markers, and they will lead you to the final destination.
The Bazaar safe code comes in the form of a mathematical equation, the answer to which is 5-1-0. The code is tucked behind a rock station poster on the wall, its corresponding safe is sitting on a crate next to a guitar in the same room.
How to get Moonshine quest safe code
Horseshoe has just one safe to crack as well. To get access to it, you must make sure Jack and Joe survive the Water Tower quest. This will allow Jack to give you the Moonshine quest later on by sending you back to the Horseshoe Water Tower to fetch a hidden bottle of Moonshine. You won’t have to search for a code this time, as Jack provides it upon giving you the quest. It’s the year America was discovered by European explorers, 14-9-2.
The safe is in a locked room in the mid-section of the Water Tower, underneath the arches. Lockpick the door, and the safe containing the Moonshine will be slightly to the right. Bringing it back to Jack and Joe will make them very happy, and returning to their cell later on will reveal why they craved the Moonshine so badly.

How to get Quarry End safe code
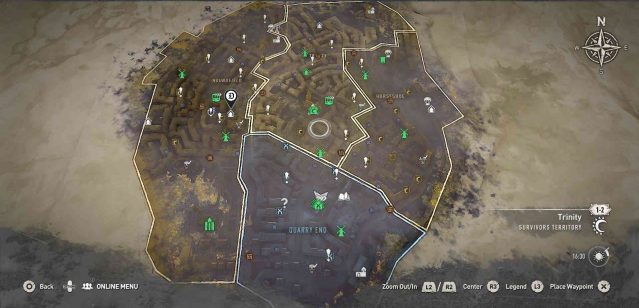
We go to the southern part of Quarry End for the next safe code. One of the houses in the region has its main entrance bricked off, but there’s an open window on the second floor. Jump through it, and you’ll see a big box lying in front of a king-sized bed. The safe code is inside the box.
The code is a mathematical equation, which is easy to mess up. The correct answer is 22-67-66. The safe is in the back of the same room, tucked away in the corner on top of a small cabinet.
How to get Downtown thugs bandit camp safe code
This safe code is in a bandit camp in the westernmost part of the Downtown district. Similarly to the Bazaar code, you’ll be climbing up, only this time you have to follow red instead of yellow path markers. You’ll reach an open terrace with a broken window on the first floor above it. The window has a yellow cloth hanging from it. Jump in to find the safe on the desk on the far right side.
To get the code, you must go even higher. There’s a huge vent-like opening on the right wall. You can use the desk or the yellow pillar to get up there. You will enter a room. You’ll find a sheet on the small coffee table in the middle with the safe code written on it. The code for the Downtown thugs camp safe is 3-1-3. Return to the safe and crack it open.
Remember that this is a bandit camp. If you’re arriving here for the first time, there will be a bunch of enemies to clear, so come prepared for battle. You can also try to make a run straight for the safe code of course, but you’ll need your parkour to be on point.

How to get Downtown-Wharf border safe code
This safe code is one of the easiest to get. It is at the exact border between Downtown and The Wharf, eastward of the Downtown electrical station. Climb on top of the broken-down bridge and find the abandoned camp there. The safe code is on top of the table in the middle of the camp.
The code is derived from the date on which the United States declared its independence, July 4, 1776. Therefore the safe code is 74-17-76. Walk into the open trailer and crack the safe, located on a shelf next to the makeshift bed.
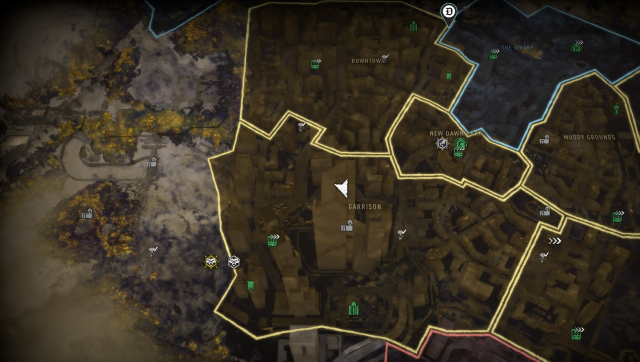
How to get Garrison Electrical Station safe code
This dysfunctional electrical station is located near the southern border of the Garrison district. The safe code is in the same room as the second generator, which you’ll have to interact with if you want to reactivate the station. The room is on the second floor behind a closed metal gate. Open it by pushing the button next to the gate, and walk alongside the right wall of the room. You will find the safe on top of some machines and the code in a box on the floor. The safe code is the first three numbers of Pi, 3-1-4.
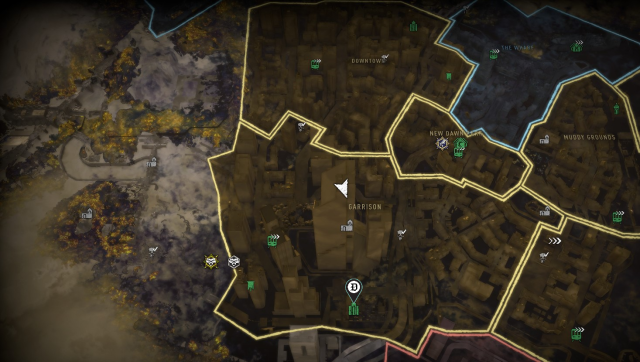
How to get VNC Tower safe code
The imposing VNC Tower is Garrison’s primary attraction. Such a tall building ought to have something of value in it, and it does—the second safe code in Garrison can be acquired here. To get it, you must reach the tower’s roof. The easiest way to do this is by using the elevator inside the building, which becomes available after completing the Broadcast quest.
Once on top, you can grapple off the extended blue platform and make your way down and into the room containing the safe through a pair of open windows. The safe code is on top of the large desk at the bottom of the room. It is the number of the beast, 6-6-6. The safe is on a shelf right next to the window you jumped in through.

How to get Dam Nightrunner’s Hideout safe code
Moving out of the districts can be beneficial, especially if you know where to look. The Nightrunner’s Hideout near the dam is a good place to visit, because you guessed it, there’s a safe code there.
What you’re looking for is a tin barrack with a scaffolding rising above it. Climb up to the top of the scaffolding and get the safe code from a box on the ground. It’s another historical buff quiz. This time, it’s the baptism of Poland. We only need the year here, which means the code is 9-6-6. You can climb down and enter the barrack now. The safe is situated on top of a large box next to yet another makeshift bed.

How to get New Dawn Park safe code
New Dawn Park is the smallest district in Dying Light 2, but it is large enough to house one safe code. The target is the lower left apartment building in the western part of New Dawn Park. There’s a vent you can use to climb up to the first-floor terrace. From there, you can jump across to reach the abandoned apartment space.
Walk down the hall and turn immediately to the right. There’s a locker right around the corner that contains the safe code. This is arguably the hardest code to figure out in the whole game. It only says, “Little Boy, length, diameter, filling weight”, one of the many historical references in Dying Light 2 Stay Human.
These measurements refer to the atomic bomb that was dropped over Hiroshima during World War Two, based on the “Little Boy” design. Little Boy’s parameters were 10 feet, 28 inches, and 64 kilograms. Therefore, the New Dawn Park safe code is 10-28-64. In case you’re curious, the second atomic bomb used at Nagasaki was called the Fat Man.
Turn around and jump over the table to reach the library on the opposite wall. The safe is on the leftmost shelf.

How to get Treasure Hunt quest safe code
Treasure Hunt sounds about right for this safe code. It requires deciphering letters and adventuring in deep waters to find and unlock it, but first, you must make sure you can even begin the quest. Treasure Hunt only becomes available if you keep the map at the end of The Deserter quest. The map is actually a cipher, and breaking the code will give you the necessary tool to open the safe at the end of the quest.
Following the steps will reveal the map’s secrets. The decrypted message says the following: “Muddy Grounds, Water Tower Basement, Zero Three, Two One, Six Seven”. This is the location of the safe and its equivalent safe code.
You must travel to the Water Tower in northeastern Muddy Grounds. The note says the safe is in the basement, so this time, instead of climbing, you will be diving. Enter the ground level of the water tower and navigate your way down the metal platforms and into the water. Swim down to the bottom: The safe is beside the wall, next to a large yellow crate. Insert the 3-21-67 code to open the safe and finish the Treasure Hunt quest.

How to get Muddy Grounds container safe code
There is a sizable building with a large skull graffitied on its side near the border between Muddy Grounds and The Wharf. That building…is not the one that contains the safe code. The code can be found in the green metal container that’s glued to the side of the graffiti structure.
You must have the GRE access key in your inventory to open the container, but that’s acquired during the Pilgrim’s Path quest at the beginning of the game, so you shouldn’t have any trouble receiving entry to the container. The code is on the metal shelf the furthest from the entrance and reads, “The answer to the ultimate question of life, the universe, and everything”.
This is a reference to The Hitchhiker’s Guide to the Galaxy, and the straight answer would be 42. However, Dying Light 2 wants the code in binary. Applying the binary conversion gives us the correct safe code, 10-10-10. The safe is on top of a small cabinet sitting between the two metal shelves closest to the entrance.

How to get Church of Saint Thomas The Apostle safe code
It’s time to get holy. The Church of Saint Thomas the Apostle, in the eastern part of Saint Paul Island, contains one of three safe codes in the district. The way of getting it is quite similar to the Bazaar, i.e. you need to reach a small room near the roof of the building. You can do that by following the yellow markers that lead up or by alternative methods such as grappling or gliding from the nearby windmill.
You can enter the room with the safe through one of several open windows. The safe is on top of a wooden crate, but we’re not ready to open it yet. We haven’t got the code! You must go even higher to obtain it, as it is in a box on the roof itself, above the room with the safe. The Saint Thomas Church safe code is 4-4-4.
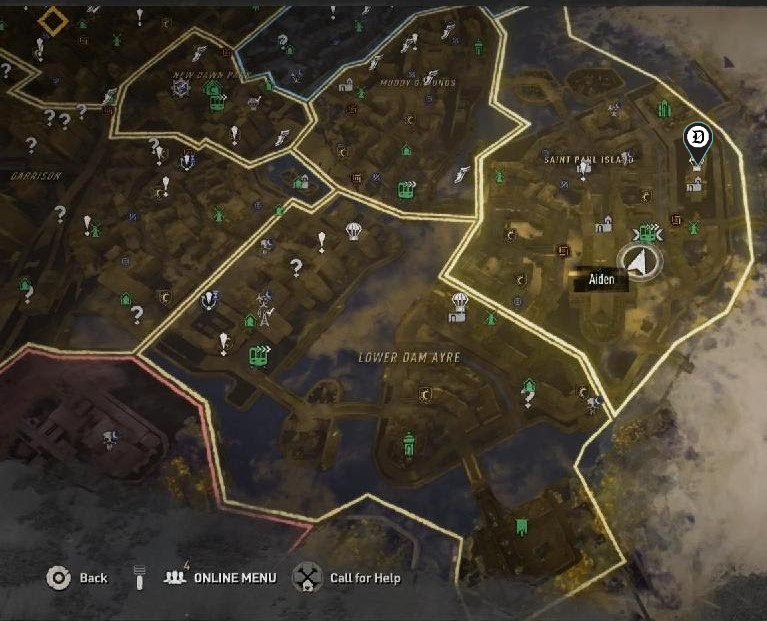
How to get Saint Paul Island container safe code
The second safe code is in a green metal container very similar to the one at the graffiti building in Muddy Grounds. This container sits in the open by the river in the southernmost corner of Saint Paul Island, below Saint Paul Cathedral. As with the previous container, you’ll require the GRE access key to open it.
Once you enter the container, turn immediately to the left. There are a couple of bookshelves mounted on the wall. The safe code is in the bottom right corner of the left shelf. The code asks you about the end date of World War Two in Europe. Though fighting continued for a few more days, the official surrender of Nazi Germany was signed off on May 8, 1945.
Dying Light 2 plays a little trick on players with this code. It uses European date formatting instead of American, so the code is 85-19-45, and not 58-19-45. Now you can open the safe, which is sitting on the wide metal shelf to the right, facing toward the back of the container.
How to get Dark Hollow safe code
The third and final safe code can be looted from the Dark Hollow in southern Saint Paul Island. You will actually have to find two safes this time around because the code for the second one is locked inside the first.
Go inside and climb up the stairs to the second floor. The door on the left is partially sealed off with wooden planks, but you can crawl underneath the planks. The first safe is immediately to the right after you enter through the door, placed on the large library. Lockpick it to recover the safe code, which is 9-8-7.
The ceiling has partially collapsed, providing easy access to the upper floor. Turn around and jump over the ceiling. There’s another partially blocked off door to our left and we’ll crawl through it the same way we did the previous one. The ladder on the other side of the door will take you up to the second safe, sitting on a small bookshelf by the right wall. Use the retrieved 9-8-7 code to unlock it.

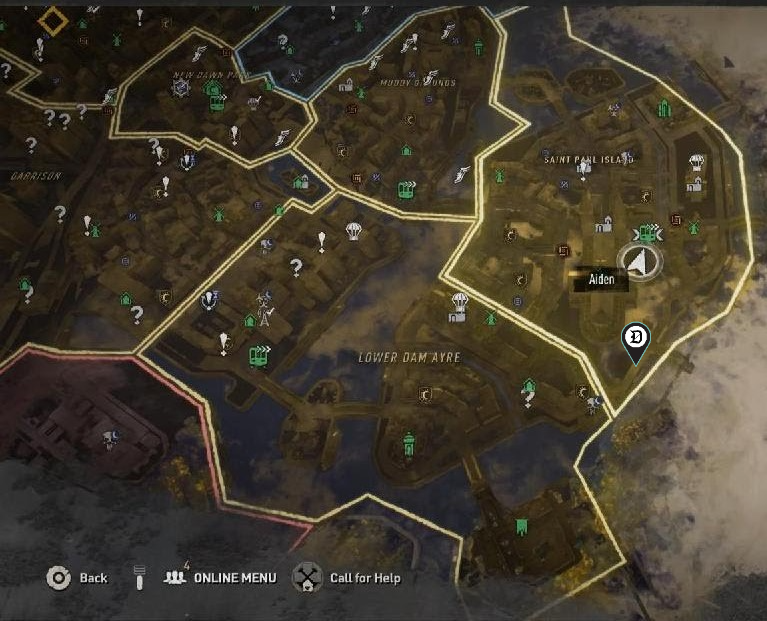
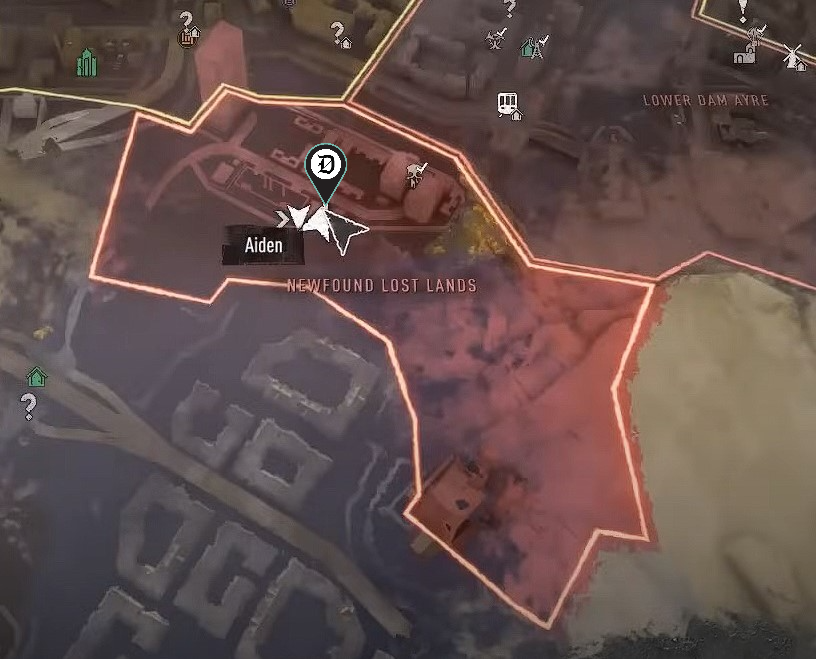
How to get Newfound Lost Lands safe code
The sole safe code in Newfound Lost Lands is inside the abandoned store at the bus station in the northwestern section of the district. It’s a short, yellow building, with a large white bus parked a few meters in front of the entrance.
The safe code is underneath the middle counter and has the potential to cause slight confusion. It wants you to input the Absolute Zero temperature in Fahrenheit, which happens to be -459.67 degrees. Temperatures aren’t something we’d round up usually, but that’s what Dying Light 2 wants us to do, and even the rounding is weird. Instead of -460, which is closer to the actual Absolute Zero, the game goes in the opposite direction, hence the safe code being 4-5-9.
After these confusing arithmetics, all that’s left to do is turn around, walk into the kitchen behind the counter and open the safe, which is by the sink to the right of the entrance.
Now you know how to crack all safe codes in Dying Light 2 Stay Human. 19 codes is a lot, but so is the game’s open world. Even with the exact knowledge of where to look and how to decipher all the puzzle codes, it would still take you some time to collect them all. Not to mention several are tied to quests, some of which can’t be started without first completing other quests. Suffice it to say the hunt for safe codes will take some time, which is perfectly on brand for Dying Light 2. Patience, diligence, and perseverance are the name of the game.


Published: Mar 15, 2025 11:48 am