Avatar: Frontiers of Pandora has plenty of different exploration mini-games and collectibles throughout the expansive open-world map, but not all of them are easily tracked or located. In particular, Data Collectors can cause a bit of a headache while you’re getting the hang of how to solve them.
Finding a Data Collector zone in the first place already requires a bit of luck—and once you have found one, solving it can be just as troublesome. This guide won’t be able to provide the location of every Data Collector in Avatar: Frontiers of Pandora (that guide will come soon,) but it will explain exactly how to solve Data Collectors once you’ve found one.
Avatar: Frontiers of Pandora: Data Collectors, explained
There are two types of collectibles in Avatar: Frontiers of Pandora—exploration POIs, and Lost Items. Exploration POIs are significantly easier to locate, as they receive map icons even when you haven’t yet discovered the POI. These exploration points include Bellsprigs, Sarentu Totems, Tarsyu Saplings, and Ikran Gear Baskets. While you might not know which specific one you’re heading towards before you arrive, you will know where you’re headed.
Lost Items, on the other hand, do not receive any markers until they are discovered, meaning you just have to get lucky and chance upon one. Lost Items include Zeswa Kites, Treasure Hunter Comics, and Data Collector Sites.
Out of all the Lost Items, Data Collectors are the most challenging. Not only do they lack any map marker icons, but they also present a difficult mini-game once you’ve found one, and to top it off that mini-game isn’t very well explained. The abridged version is that after you find a Data Collector Site, you must use SID to scan the terminal, and then find several other unmarked probes within the surrounding area to complete the Data Collector. The next section will provide more detail on how to find these probes and complete Data Collectors.
Avatar: Frontiers of Pandora: How to complete Data Collectors
After you locate a Data Collector Site, Priya will contact you on your radio and tell you to look for a couple of probes and use SID to secure the data from the site. That’s pretty much all she will say about solving the mini-game, so you’re sort of left to the wolves.
The first and most important thing is you switch your tracked quest to the newly acquired Exploration Quest called System Reboot which begins when you locate a Data Collector. This is because all three of the Data Collector Probes that you must scan with SID are contained within a given area, and the only way that you can know whether or not you’re inside of that area is by actively tracking the quest. When you are inside the area, the quest tracker will show you how many out of three Probes you have currently found. When you are outside of the given area, you will instead be prompted to go to the Data Collector.
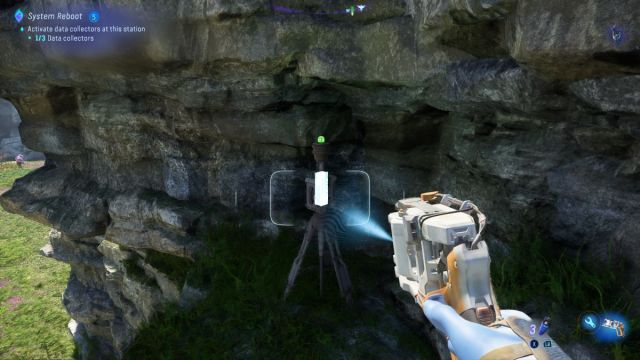
The Probes themselves are tiny—so while they are marked by Na’vi Senses, you cannot rely on that fact to locate them, as unless you are pretty much looking right at one, it won’t be noticeable. What you are looking for is a short metal rod protruding from the ground with a blinking red light on top. The probe is only a foot high, so you will need to engage in an Easter egg hunt—simply scouring the area will seldom lead to finding a probe.

| Each Data Collector Site has three Probes that must be scanned to complete it. |
| These probes are tiny metal rods with red lights on top of them. The red light will turn green after you use SID to scan it. |
| The three probes are contained within a small radius, and your Quest Tracker will tell you when you’re inside of that radius. |
Once you find a Data Collector Probe, you must use SID to hack it, which will cause the red light on top to turn green and your Quest Tracker to update to reflect that one of the three probes has been scanned. After you have found all three, the Data Collector will be completed, and you will earn a huge chunk of Clan Favor.
At the time of writing this guide, it is unknown what the reward for completing all nine Data Collector Sites is, but this guide will be updated once we’ve found them all.


Published: Dec 7, 2023 08:01 pm