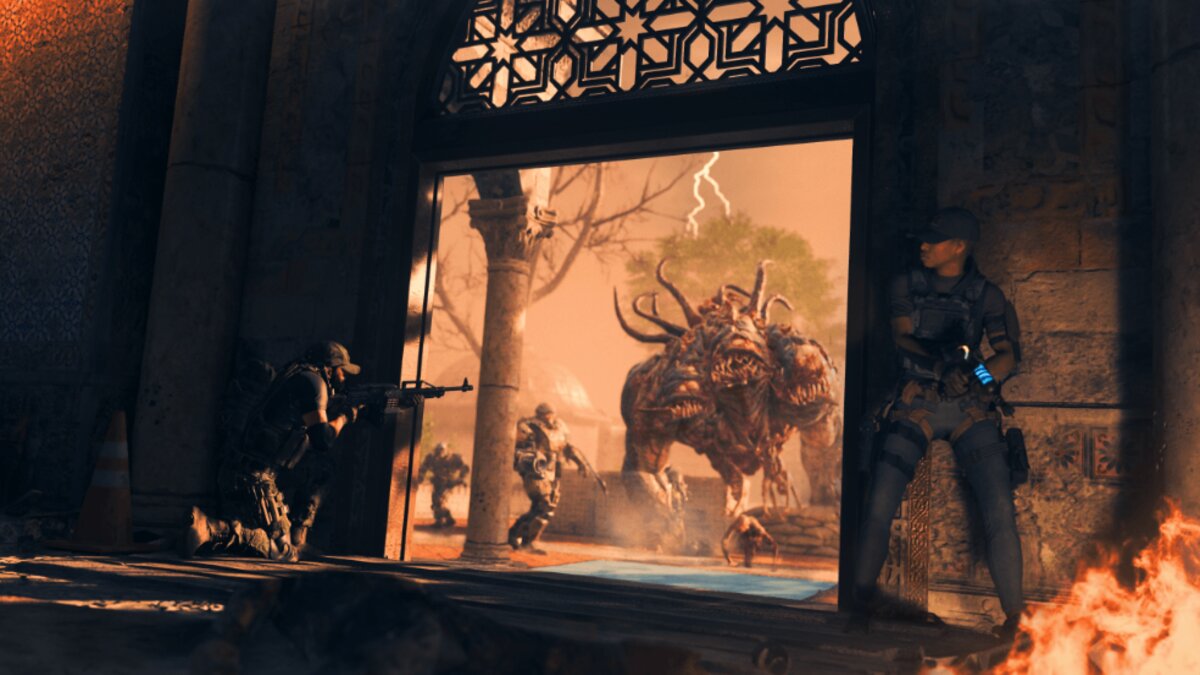
Venturing out into Call of Duty MWZ’s red zone just got a little scarier if you don’t know what any of the icons mean on Urzikstan’s tac-map. Operation Deadbolt needs you but are you brave enough to weather the storm?
This is our full guide on everything you need to know to survive your deployment in Urzikstan for Operation Deadbolt in Modern Warfare 3’s Zombies.
MWZ: Full Urzikstan guide
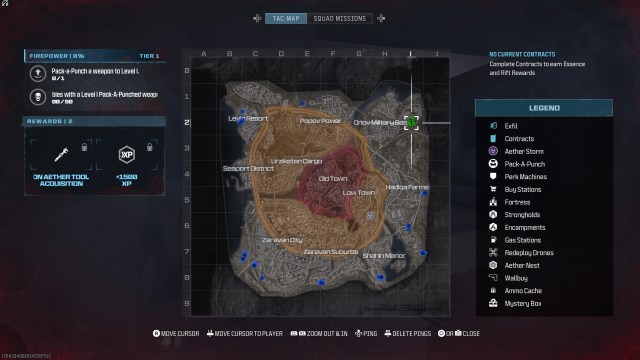
Urzikstan is divided into sectors or regions similar to that of Warzone and DMZ maps: Ashika Island, Al Mazrah, and Vondel. The POIs (points of interests) are as follows:
- Levin Resort (low threat)
- Popov Power (medium threat)
- Orlov Military Base (low threat)
- Seaport District (low to medium threat)
- Urzikstan Cargo (medium threat)
- Hadiqa Farms (low threat)
- Low Town (medium threat)
- Zaravan City (low to medium threat)
- Zaravan Suburbs (low to medium threat)
- Shahin Manor (low threat)
- Old Town (high threat)
The entire map is separated by threat level. The further you head into its center, the lower risk of survival and increased difficulty of the enemies you’ll find inside. While the rewards are greater inside medium and high threat zones (orange and red), there is a tiny difference between the red and orange zone when it comes to obtaining desirable rewards.
If you want to enter into the orange zone, you must Pack-a-Punch your weapon to stand a chance. You will want to adopt a contract and Pack-a-Punch strategy where you complete contracts to earn 5,000-15,000 Essence, upgrade your primary weapon, and move closer towards the Old Town (red zone).
MWZ Upgrades: Pack-a-Punch, Mystery Box, and Wallbuy Weapon
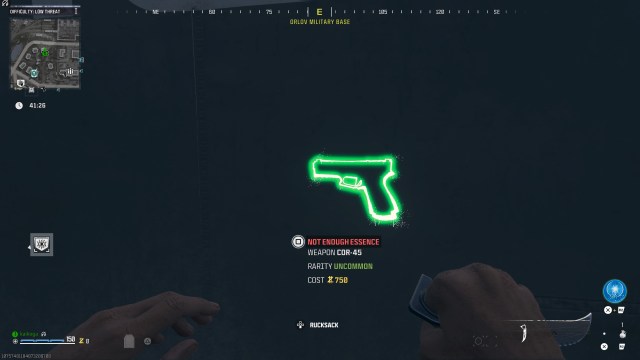
There are various ways to upgrade your survival kit in MWZ. Keep in mind that any upgrades you equip are solely for the deployment you purchased the upgrade in. Therefore, any Pack-a-Punched weapon will revert back to its common or uncommon (if contraband) in the next deployment.
Each upgrade varies in pricing. While Wallbuy Weapons and Mystery Boxes cost less than 1,000 Essence, the more important upgrades like Pack-a-Punch will set you back 5,000 Essence. Points are easily accumulated by completing Contracts, clearing Mercenary and Infected Strongholds, and Aether Nests.
These are all available upgrades in Urzikstan:
- Mystery Box – Try your luck at the Mystery Box for a random MWZ item.
- Wallbuy Weapon – Purchase the rarer weapon straight off the wall.
- Pack-a-Punch – Upgrades a weapon. Three weapon levels available. Costs 5,000 for level one, 10,000 for level two, and 15,000 for level three.
Although their spawns are randomized, you can often find what you need inside the low-threat and medium-threat zones. You could also skip visiting machines such as Elemental Pop, Tombstone Soda, Speed Cola, and Der Wunderfizz if you focus on Contract completion where perks in a can are typically delivered in Reward Rifts. An important note however is Der Wunderfizz only spawns in Old Town (red zone).
MWZ Perk-a-Cola
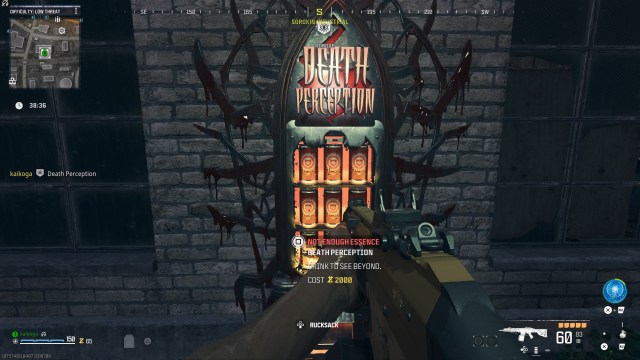
The only real throwback to classic Call of Duty Zombie mode is the Perk-a-Colas. Acting as the MWZ Perk system, players can pick these up per match, or hold them in their inventory for their next deployment. By safely exfiling with these cans in hand, you can permanently craft them using their schematics rather than having to find or purchase them every match.
Every Perk has its own cooldown after using the Schematic Crafting menu before your deployment. Unlike the Wonder Weapons’ 48-hour cooldown, each Perk-a-Colas only has three hours before you can craft it again. But that isn’t stopping you from spending your Essence and equipping one of these colas again.
These are all available Perk-a-Colas in MWZ:
- Quick Revive – Revive time reduced by half.
- Elemental Pop – Every bullet of your magazine has a chance to inflict an ammo mod effect.
- Tombstone Soda – A tombstone is dropped where you died that holds all of your items.
- Jugger-Nog – Increased max health.
- Speed Cola – Increased reload and armor replenishment speed.
- Deadshot Daiquiri – No ADS weapon sway and added aim assist onto critical spots for increased damage.
- Death Perception – Resources and enemies are more visible.
- PHS Flopper – Explosive dolphin dives that remove fall damage.
- Der Wunderfizz – Variety Perk-a-Cola machine.
MWZ Contracts
Just like DMZ, contracts are a great way to build Essence, upgrade your weapons, and hit mission goals. Certain contracts are far easier to complete than others such as Spore Control, Deliver Cargo, and Eliminate the Bounty. Of course, the difficulty depends on whether you are playing solo or with other players.
- Outlast – Activate the PND for analysis. Defend the area until the PND reaches 100 percent
- Spore Control – Throw six Inhibitor devices on six Spores to weaken them to its red state. Destroy all six Spores.
- Raid Weapon Stash – Locate and drill into the weapon stash. Defend until the drilling timer concludes. Secure the stash inside once finished.
- Aether Extractors – Interact with the Aether Extractors will defending your position.
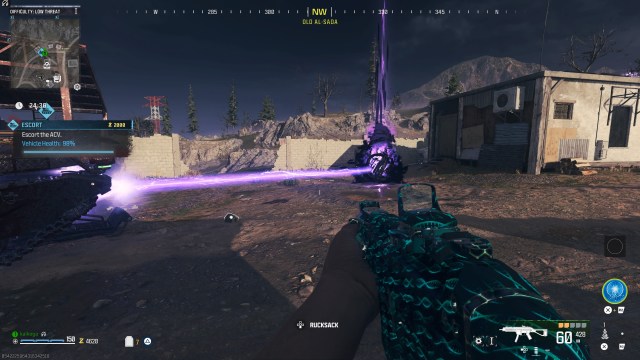
- Escort – Escort and defend the vehicle by staying close to it (like Overwatch‘s payload). Vehicle has a health bar. Can kill zombies when on the move but will take damage when stationary.
- Deliver Cargo – Find and deliver cargo to the extraction point.
- Defend Ground Station – Collect Seismic Refractors data and upload to the Server while defending against Terminus mercenaries.
- Eliminate the Bounty – Locate and eliminate the target.
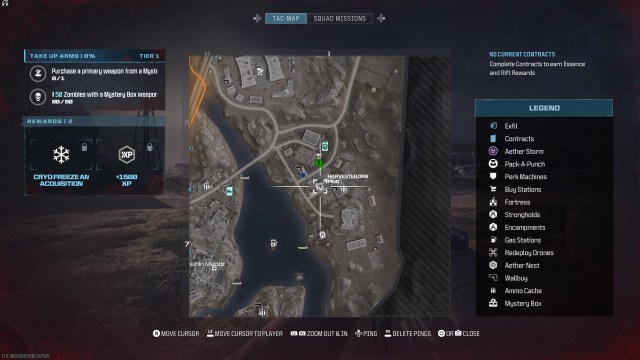
All Contracts have their locations marked on the tac-map. Each appears the same when you approach the walkie-talkie in person. Make sure to refer to the map for which Contract you wish to initiate. The objectives appear on your screen, alongside a marker placed on the mini-map to pinpoint exactly where you need to go.
MWZ Landmarks
The landmarks on Urzikstan are campsites, buildings, and sometimes locked areas that offer a ton of XP, rewards, and possible weapon Acquisitions. These are all landmarks readily available to explore, clear, and loot in Urzikstan for Operation Deadbolt:
- Aether Nest – Buildings filled with zombies. Clear the nest by destroying every cyst. Mimics, nest crawlers, and higher-tiered enemies like armored zombies can spawn here regardless of the zone.
- Infected Strongholds – Mercenaries turned into zombies. Plays the same as Aether Nests. Destroy all cysts and clear the area of zombies to open the crystallized crates for loot.
- Mercenary Strongholds – Requires Mercenary Stronghold Keycard. Clear the building of mercs, drill into the safe, and defend the area until the safe opens for you to claim its contents.
- Mercenary Camp – A small campsite of mercenaries including snipers that you need to clear. Has a ton of loot inside.
- Mercenary Convoy – Multiple armored vehicles that drive around the map. Defeat the mercs to loot the crates in the back of each vehicle.
- Legacy Fortress– Can spawn in towards the end of the match. Requires Fortress Key from Mercenary Stronghold.
- Aether Storm – These storms appear randomly on the map similar to Pokémon Scarlet and Violet‘s Mass Outbreak. Outlined by its hazardous symbol on the tac-map, the Aether Storm holds some of the strongest MWZ enemies like the Stormcaller.
MWZ Miscellaneous items
There are a ton of opportunities to help you get to-and-from sectors of Urzikstan with a simple click of a button or a wander into its proximity. These offer free help to fast-travel across the map, replenish stock, and keep you alive a bit longer.
Almost every time I spawn into a deployment, there are no exfil close to me. I almost always have to travel halfway across the map and my hesitation to venture into the red zone stops me from progressing as fast as I’d like. But there are ways to get around the map with ease and MWZ being strictly a PvE mode means you’ll have no problems with campers, snipers, and random C4 on your vehicle.
These are all miscellaneous items in Urzikstan to help you in each deployment:
- Ammo Cache – Replenishes ammo.
- Gas Station – Replenishes fuel and repairs vehicles.
- Deadbolt Turret – Requires circuit to activate. Useful as a quest item or to clear hordes and militia depending on its location on the map.
- Aether Tear – Teleport to the sky to pop your parachute and fast-travel across Urzikstan.
- Redeploy Drone – Zipline to the sky to free fall or parachute to another location across Urzikstan.
- Harvester Orb – Destroy the orb for Essence and Aether Tools.
- Exfil – Exfils spawn randomly on the map, typically around the northern and western perimeter. You need to initiate an exfil by interacting with the green smoke, defending your position, and getting onto the helicopter when it arrives. The counter reduces to five seconds even if you enter the helicopter at the 30-second mark.

Published: Nov 13, 2023 08:30 am